11 October 2019
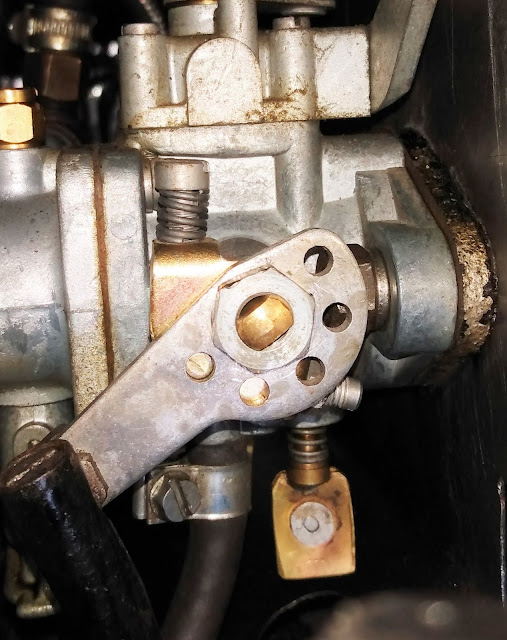
While setting up the carb I struggled to get decent access to the volume control screw. This has to be adjusted with a flat bladed screwdriver from beneath the carb. Heat shield has a hole for access but still difficult and hot!
Here is my solution...may not be the best but it works for me.
Took out the screw and turned it into a 'wing screw' by adding a brass wing.
Actually used two pieces of .033 inch brass strip pop rivetted together and separated slightly to be a good fit in the screw slot. Then soldered them in place. You could use a single piece of metal but the brass was what I had to hand.
Makes adjustment much easier as I can now turn the screw by hand and access is easier.
Total Pageviews
Rear Brake Shoe Adjustment.
May 2022
Rear wheel cylinder on offside brake now seized! Just lack of use, I guess.
Removed and replaced with new but had to make up length of new wheel cylinder with a 3.5mm spacer and new snail cam similar to the nearside setup.
When fitting the new unmodified wheel cylinder I could not get the brake shoes to lock on the brake drum even on full adjustment of the old snail cam!
Old wheel cylinder had an effective length of 58mm but new wheel cylinder was just 54.5mm.
Only difference this time was I glued in a metal spacer below the origin 'U' shape piece.
With the modified part and a new snail cam from MEV ( gave about 2mm more lift) all was good.
See photos.
Recently while balancing all the brakes to bite at the same time I couldn't get the nearside rear brake to bite hard on the drum, even when fully adjusted via the snail cam adjuster.
After checking for any brake drum reskimming or brake show wear I was still puzzled. Brake drums are still the original 9.00 inches diameter and the brake shoes are new. The snail cam adjuster was original, looking in good order.
Decided to check the offside rear brake setup, and all appeared the same but the adjustment here was good!
Overnight I recalled changing the nearside brake cylinder after one leaked. I had bought a new pair and still had one unused.
After checking the effective length of the nearside and offside brake cylinders I found the new one was 5 mm shorter than the other! Thus the adjuster needed to cope with an extra 5 mm of adjustment to get a hard bite.
Went back to the original supplier (MEV) and a second source and both confirmed the length at close to 55mm. The offside cylinder measured close to 60 mm!
MEV did suggest a new snail cam adjuster that they say is larger than the original to compensate for brake wear. Ordered this.
However in the meantime I removed the pressed metal bearing shoe stop (fig 1.) and made a new one from a piece of 8 mm square steel door handle spindle. Made the base 2.5 mm thicker at 4 mm (was 1.5 mm) and the sides 1.5 mm thick per the original. Made two centre punch marks each side of the new shoe stop, to hold it in place, and tapped it gently in place to hold.
Reassembled everything and it did make and improvement but the adjustment was still near the max.
Next day the new snail cam adjuster arrived and was clearly larger in size.
Fitted this and all was good. Now needs about 6 clicks to get a solid bite.
Didn't go back and take out my modified shoe stop....the new adjuster may work with the original shoe but there are only so many times I can remove and refit brake shoes...especially those beehive springs!! Anyone got a good alternative for those little perishers!
If you have a similar problem try the snail cam adjuster from MEV Spares first it may well do the trick.
Fig. 1 Shoe stop before removal...easily remove ...needs little force.
With shoe stop removed
Square bar from domestic door handle
 |
| Modified Shoe Stop .. hacksawed and filed to shape. |
 |
| Existing Snail cam adjuster |
Subscribe to:
Comments (Atom)


.jpg)


